Are you ready to unlock the full potential of your Samsung S23 Ultra? Look no further than this ultimate guide on how to set up eSIM on your device in just 5 easy steps. With eSIM technology, you can say goodbye to physical SIM cards and hello to a more convenient and flexible way of managing your mobile network connections. Whether you’re a seasoned tech enthusiast or new to the world of eSIM, this guide has got you covered.
We’ll take you through each step, providing clear instructions and helpful tips along the way. From activating your eSIM to selecting a mobile carrier, this guide is designed to make the process seamless and hassle-free. So, grab your Samsung S23 Ultra and let’s get started on this exciting journey towards a more streamlined mobile experience.

Benefits of using eSIM on your Samsung S23 Ultra
eSIM technology offers a range of benefits for Samsung S23 Ultra users. Firstly, it eliminates the need for physical SIM cards, freeing up space in your device and reducing the risk of losing or damaging your SIM card. With eSIM, you can easily switch between mobile carriers without needing to physically swap out SIM cards. This is particularly useful for frequent travelers or individuals who require multiple mobile network connections.
Additionally, eSIM provides greater flexibility in managing your mobile network connections. You can add and remove mobile plans directly from your device, without the need for physical SIM cards or visiting a store. This allows for more control over your mobile usage and the ability to switch plans or carriers on demand.
Furthermore, eSIM technology offers improved security compared to traditional SIM cards. The encrypted nature of eSIMs makes it more difficult for unauthorized individuals to access your mobile network connection. This added layer of security ensures your data and personal information are better protected.
Understanding the prerequisites for setting up eSIM
Before we dive into the step-by-step process of setting up eSIM on your Samsung S23 Ultra, let’s first understand the prerequisites.
To begin, ensure that your device supports eSIM technology. The Samsung S23 Ultra is equipped with eSIM capabilities, but it’s always a good idea to double-check and confirm this information. You can refer to your device’s user manual or check the manufacturer’s website for specifications.
Next, you’ll need to check if your mobile carrier supports eSIM activation. Not all carriers offer eSIM services, so it’s important to verify this information before proceeding. You can visit your carrier’s website or contact their customer support to confirm if eSIM activation is available.
Step 1: Check device compatibility and carrier support
The first step in setting up eSIM on your Samsung S23 Ultra is to check device compatibility and carrier support. As mentioned earlier, ensure that your device supports eSIM technology. You can find this information in your device’s user manual or by visiting the manufacturer’s website.
Once you’ve confirmed device compatibility, it’s time to check if your mobile carrier supports eSIM activation. Visit your carrier’s website or contact their customer support to inquire about eSIM services. They will provide you with the necessary information and instructions to activate eSIM on your device.
Step 2: Activate eSIM with your carrier.
Now that you’ve confirmed device compatibility and carrier support, it’s time to activate eSIM with your chosen carrier. The process may vary depending on your carrier, but generally, you’ll need to follow these steps:
- Contact your carrier’s customer support or visit their website to initiate the eSIM activation process.
- Provide the necessary information, such as your device’s IMEI number and any other required details.
- Follow the instructions provided by your carrier to complete the eSIM activation process.
It’s important to note that some carriers may require you to visit a store for eSIM activation. In such cases, make sure to schedule an appointment and bring your Samsung S23 Ultra along with any required identification or documentation.
Step 3: Add an eSIM plan to your Samsung S23 Ultra.
Once you’ve successfully activated eSIM with your carrier, it’s time to add an eSIM plan to your Samsung S23 Ultra. Here’s how you can do it:
- Open the Settings app on your device.
- Navigate to the “Connections” section.
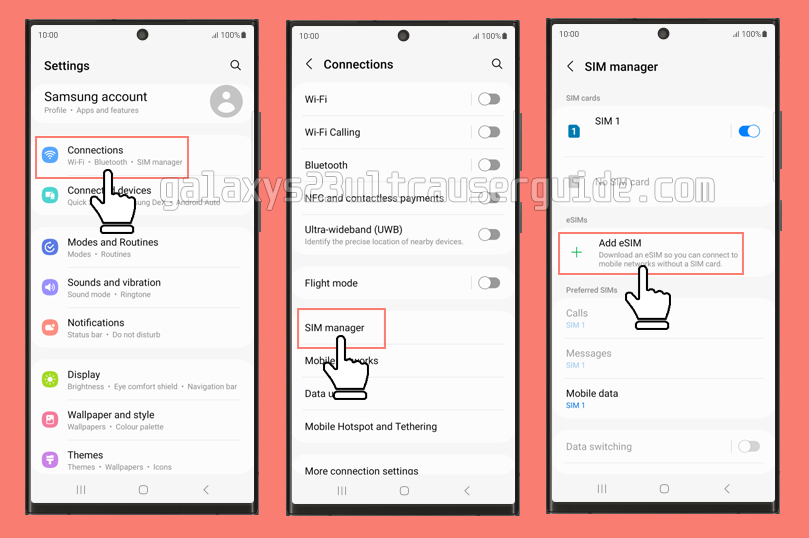
- Select “SIM manager” or a similar option.
- Choose the option to add eSIM.
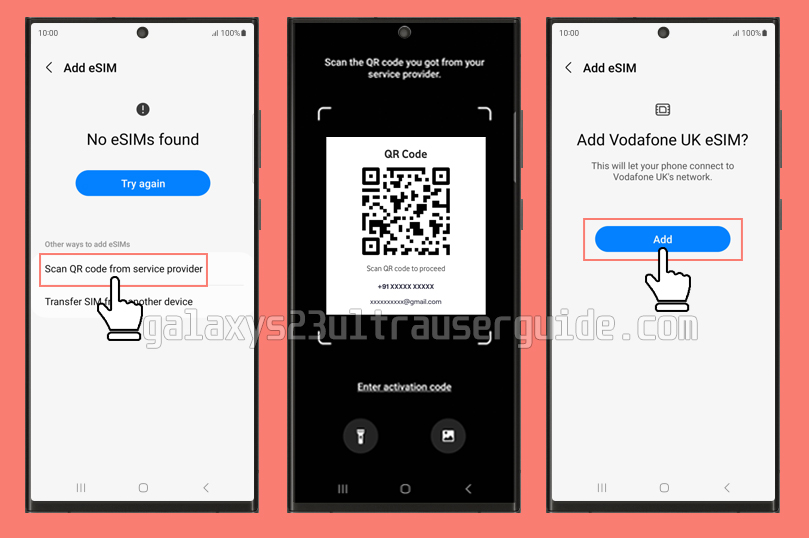
- Follow the on-screen prompts to scan the QR code or enter the activation code provided by your carrier.
- Once the eSIM plan is added, you can customize the settings and preferences according to your needs.
Step 4: Set eSIM as your primary or secondary SIM.
With the eSIM plan added to your Samsung S23 Ultra, you can now set it as your primary or secondary SIM. This will determine which SIM is used for calls, messaging, and data. Here’s how you can set your eSIM preferences:
- Open the Settings app on your device.
- Navigate to the “Connections” section.
- Select “SIM card manager” option.
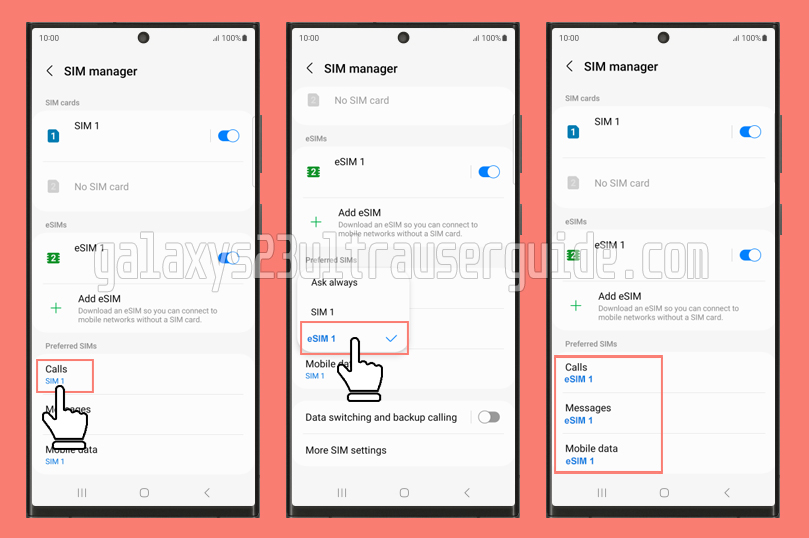
- Choose the eSIM plan you want to set as primary or secondary.
- Enable the option to use the selected eSIM as the default SIM for calls, messaging, and data.
Keep in mind that the specific steps may vary depending on your device’s software version. If you’re unsure, refer to your device’s user manual or contact the manufacturer’s support for assistance.
Step 5: Troubleshooting common eSIM setup issues
While the eSIM setup process is generally straightforward, you may encounter some common issues along the way. Here are a few troubleshooting tips to help you resolve any potential problems:
- Ensure that your device has an active internet connection during the eSIM setup process.
- Restart your device and try the eSIM setup process again.
- Double-check that you’ve entered the correct activation code or scanned the QR code accurately.
- Contact your carrier’s customer support for assistance if you’re experiencing persistent issues.
Remember, each carrier may have specific troubleshooting steps or requirements, so it’s always a good idea to reach out to them for personalized support.
Additional tips and recommendations for using eSIM on your Samsung S23 Ultra
Now that you’ve successfully set up eSIM on your Samsung S23 Ultra, here are some additional tips and recommendations to enhance your eSIM experience:
- Regularly backup your eSIM profiles to avoid losing your mobile plans in case of device loss or damage.
- Explore different mobile carriers and plans to find the best fit for your needs. With eSIM, it’s easier than ever to switch between carriers and test different plans.
- Keep track of your eSIM usage to ensure you’re not exceeding any data limits or incurring additional charges. Most devices have built-in tools to monitor data usage.
- Familiarize yourself with the eSIM management options available on your device. This includes features such as setting data limits, managing roaming preferences, and more.
By following these tips, you can make the most of your eSIM-enabled Samsung S23 Ultra and enjoy a seamless mobile experience.
Conclusion
Congratulations! You’ve reached the end of this ultimate guide on how to set up eSIM on your Samsung S23 Ultra. We hope this guide has provided you with clear instructions and valuable insights into the world of eSIM. By following the five easy steps outlined in this guide, you can unlock the full potential of your Samsung S23 Ultra and enjoy the convenience and flexibility of eSIM technology.
Remember to check device compatibility, verify carrier support, activate eSIM, add an eSIM plan, and set your eSIM preferences to get started. With eSIM, managing your mobile network connections has never been easier. So, grab your Samsung S23 Ultra and embark on this exciting journey towards a more streamlined mobile experience.